---
title: "Session Revocation Guide"
description: "Guide for configuring session revocation using AWS SNS, WAF, and Lambda when watermarks are detected."
---
> For the complete documentation index, see [llms.txt](/llms.txt).
import { Steps } from '@astrojs/starlight/components';
When watermarks are detected, the session revocation feature can be used to block the associated session.
This guide outlines the steps to configure a session revocation system using AWS SNS, AWS WAF, and AWS Lambda.
```mermaid
sequenceDiagram
participant U as End User
participant C as Client
participant DR as DoveRunner Cloud
box Client Infrastructure
participant SNS as AWS SNS
participant Lambda as AWS Lambda
participant WAF as AWS WAF
participant CF as CloudFront
end
C->>DR: Request watermark detection from suspected leaked video
Note over DR: Watermark analysis and detection processing
DR->>DR: Watermark payload detection success
DR->>C: Return detected token information
DR->>SNS: Publish session revocation message
Note right of SNS: {"site_id": "xxx", "revoke_token": "token"}
SNS->>Lambda: Message trigger
Lambda->>Lambda: Message parsing and validation
Note right of Lambda: Create waf-uri-contains-{token} rule
Lambda->>WAF: Create/Update WAF rule
alt Request with blocked token
Note over U,DR: ❌ Block all requests accessing with the given token
U->>WAF: Content request with blocked token
WAF->>U: Access denied (403 Forbidden)
else Request with normal token
U->>WAF: Content request with normal token
WAF->>CF: Request passed through
CF->>U: Content delivery
end
```
## Prerequisites
To use the session revocation feature, the following conditions must be set up in advance:
- **Live Detection Requests Only**
- Session revocation is only supported for **live** detection requests with HLS.
- VOD (Video on Demand) detection requests do not support session revocation.
- **Session URL or Watermark Token Issuance Configuration**
- When issuing Session URLs or creating watermark tokens, `revoke_flag` must be set to `true`.
- This flag must be enabled for the session revocation feature to work properly.
- See the `revoke_flag` parameter in the [Session Manager API Guide](../../embedding/session-manager/#session-url-api) — note that the Session URL/token format changes when this flag is enabled.
- **CloudFront Embedder Version Requirements**
- CloudFront Embedder version `2.9.0` or higher must be used.
- Session revocation functionality is not supported in earlier versions.
- **Upgrading from an older version:** download the latest package from the [Sample Download Page](/content-security/forensic-watermarking/getting-started/fwm-downloads/), re-upload it as a `.zip file` to your existing Lambda@Edge function's `Code source`, click `Publish new version`, and update your CloudFront distribution's Lambda@Edge association to the new version ARN. See the [CloudFront Embedder Guide](../../embedding/cloudfront-embedder/) for the detailed upload/publish steps.
- **Infrastructure Setup Completion**
- The session revocation configuration must be implemented within your AWS infrastructure following the instructions provided in this guide.
- AWS SNS, WAF, and Lambda functions must all be properly configured and integrated.
Automatic session revocation upon watermark detection is possible only after all the prerequisites described above have been fulfilled.
:::note
The information written in this document may become inconsistent with the latest version of the AWS Console UI due to future updates from AWS. If you find any discrepancies with the actual AWS Console or incorrect links to guide articles, please contact us via [Helpdesk](https://support.doverunner.com).
:::
## Setting Up Session Revocation on AWS
### 1. Creating and Registering AWS SNS Notification for Session Revocation
#### Creating SNS Topic after Accessing AWS Console
1. **Login to AWS Management Console**
- Log in to your AWS account and search for SNS in the service list.
2. **Region Selection**
- Select your desired region from the region dropdown in the top right.
- There are no region restrictions; you may select the closest or preferred AWS region.
- However, the selected region must match the region of the Lambda function that will be created later.
3. **Create SNS Topic**
- Click the `Create topic` button on the SNS dashboard.
- Select `Standard` for the Type.
- Enter a topic name (e.g., `doverunner-watermark-detection`).
4. **Navigate to Access policy Section**
- Find the `Access policy` section on the topic creation screen.
5. **Configure Publishers Permissions**
- Select `Basic` in `Choose method`.
- Select `Everyone` in the `Publishers` item.
- This allows the DoveRunner service to publish messages to the SNS Topic.
6. **Complete Topic Creation**
- Click the `Create topic` button to create the topic.
- Copy and save the ARN of the created topic.
7. **Register AWS SNS with DoveRunner**
- Choose one of the two methods below to register your SNS.
#### Method A: Registration Using AWS Access Key ID / AWS Secret Key
1. **Prepare AWS Credentials**
- You need the AWS Access Key ID and AWS Secret Key of an IAM user who can access AWS SNS.
- The IAM user must have at least `SNS:Publish` permission.
2. **Register AWS SNS through DoveRunner Console**
- Log in to [DoveRunner Console](https://console.doverunner.com). (You can also register through [DoveRunner API](../watermark-detection-api/).)
- Navigate to `Content Security` → `Forensic Watermarking` → `Settings` → `AWS SNS Settings` → `Register`
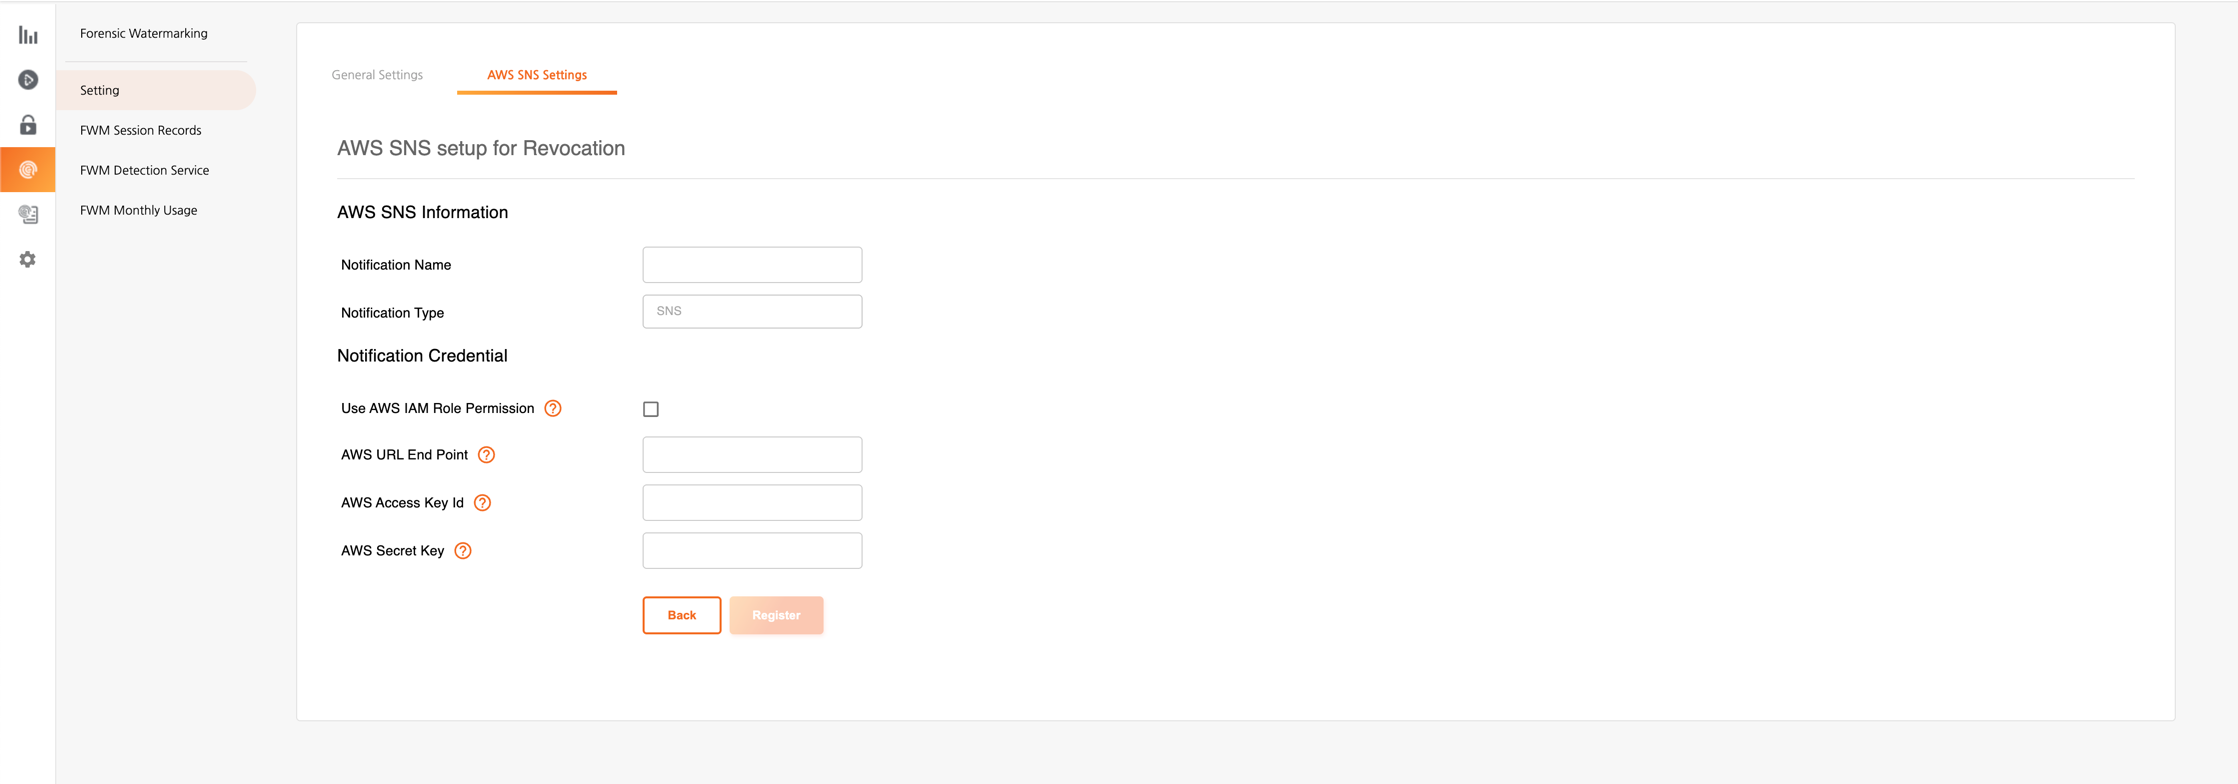 3. **Enter SNS Information**
- **Notification Name**: Enter an easily distinguishable name.
- **Use AWS IAM Role**: Uncheck the checkbox.
- **AWS ARN**: Enter the ARN of the SNS Topic created earlier.
- **AWS Access Key ID**: Enter the IAM user's AWS Access Key ID.
- **AWS Secret Key**: Enter the IAM user's Secret Key.
- Click the 'Save' button to register the SNS information.
#### Method B: Registration Using AWS IAM Role ARN
You can register SNS using an IAM Role ARN without AWS Access Key ID / AWS Secret Key.
1. **Add DoveRunner Role Permission to AWS SNS Access Policy**
- Add `sns:Publish` permission to the Access Policy of the created SNS Topic to allow messages from the DoveRunner IAM ARN.
- The DoveRunner IAM ARN can be obtained by contacting us via [Helpdesk](https://support.doverunner.com).
```json
{
"Version": "2008-10-17",
"Id": "__default_policy_ID",
"Statement": [
// ... existing policies ...
// Add DoveRunner Role permission
{
"Effect": "Allow",
"Principal": {
"AWS": "{{DoveRunner SNS Role ARN}}"
},
"Action": "sns:Publish",
"Resource": "{{SNS Topic ARN}}"
}
]
}
```
2. **Register AWS SNS through DoveRunner Console**
- Log in to [DoveRunner Console](https://console.doverunner.com). (You can also register through [DoveRunner API](../watermark-detection-api/).)
- Navigate to `Content Security` → `Forensic Watermarking` → `Settings` → `AWS SNS Settings` → `Register`
3. **Enter SNS Information**
- **Notification Name**: Enter an easily distinguishable name.
- **Use AWS IAM Role**: Check the checkbox.
- **AWS ARN**: Enter the ARN of the SNS Topic created earlier.
- Click the 'Save' button to register the SNS information.
### 2. AWS WAF Creation and CloudFront Application
#### Prerequisites for AWS WAF Creation
- **CloudFront Distribution Verification**
- A CloudFront distribution to which AWS WAF will be applied must be created in advance.
- Since CloudFront is a global service, AWS WAF can only be created in the Global (us-east-1) region.
- **Required Permissions Verification**
- The following permissions are required for WAF creation and CloudFront integration:
- `wafv2:CreateWebACL`
- `wafv2:UpdateWebACL`
- `cloudfront:UpdateDistribution`
- `cloudfront:GetDistribution`
#### AWS WAF Creation Guide
1. **Access AWS WAF Console**
- Search for and navigate to the 'WAF & Shield' service in the AWS Management Console.
- Select `Web ACLs` from the left menu.
2. **Create Web ACL**
- Click the `Create web ACL` button.
- Select `Global resources` in `Resource type` under `Web ACL details`.
- Enter a Web ACL name (e.g., `DoveRunner-Session-Revoke-ACL`).
3. **Connect CloudFront Distribution**
- Click the `Add AWS resources` button in the `Associated AWS resources` section.
- Select the CloudFront distribution to apply WAF to.
- Click the `Add` button to connect.
4. **Create Web ACL with Default Settings**
- In the `Add rules and rule groups` step, click `Next` without adding anything.
- In the `Set rule priority` step, also click `Next` with default settings.
- In the `Configure metrics` step, also click `Next` with default settings.
- In the `Review and create` step, review the settings and click `Create web ACL`.
5. **Verify Integration**
- Once Web ACL creation is complete, return to the CloudFront console and check the `Security` tab of the corresponding distribution.
- Verify that the Web ACL you just created is connected in `Security - Web Application Firewall (WAF)`.
6. **Save WebACL Information**
- After verifying the integration, navigate back to the 'WAF & Shield' service and go to `Web ACLs`.
- Set the Region to `Global`, then copy and save the `Name` and `ID` of the created WebACL.
- This information will be used in the Lambda function configuration file.
### 3. AWS Lambda Function Creation
#### Creating Lambda IAM Permissions and Execution Role
To configure Lambda@Edge, you must first create the necessary IAM permissions and execution role for this functionality.
1. **Create Lambda Policy**
- Navigate to the **IAM** service in the AWS Management Console.
- Select **Policies** from the left menu, then click the **Create policy** button.
- Select the **JSON** tab and copy and paste the policy content below.
```json
{
"Statement": [
{
"Action": [
"wafv2:GetWebACL",
"wafv2:UpdateWebACL"
],
"Effect": "Allow",
"Resource": "*"
},
{
"Action": [
"logs:CreateLogGroup",
"logs:CreateLogStream",
"logs:PutLogEvents"
],
"Effect": "Allow",
"Resource": "arn:aws:logs:*:*:*"
}
],
"Version": "2012-10-17"
}
```
2. **Configure Trust Relationship**
- Add the role below to the `Trust Relationship` tab of the created role.
```json
{
"Version": "2012-10-17",
"Statement": [
{
"Effect": "Allow",
"Principal": {
"Service": [
"lambda.amazonaws.com",
"edgelambda.amazonaws.com"
]
},
"Action": "sts:AssumeRole"
}
]
}
```
#### Lambda Function Creation
> Session revocation lambda files can be found on the [Sample Downloads](../../getting-started/fwm-downloads/) page.
1. **Start Lambda Function Creation**
- Click the `Create function` button on the Lambda dashboard.
- Must be created in the same region as the SNS Topic created earlier.
- Select the `Author from scratch` option.
2. **Enter Basic Information**
- **Function name**: Enter a name (e.g., `DoveRunner-Session-Revoke-Function`).
- **Runtime**: Select Node.js 22.x or the latest version.
- **Architecture**: Select x86_64.
3. **Configure Execution Role**
- Click `Change default execution role`.
- Select `Use an existing role`.
- Apply the IAM execution role created in the previous step.
4. **Complete Function Creation**
- Click the `Create function` button to create the function.
- Once creation is complete, you will be redirected to the function detail page.
#### Adding SNS Trigger and Uploading Source Code
1. **Add Trigger**
- Click the `+ Add trigger` button in the Function overview section.
- Select `SNS` as the trigger source.
2. **Select SNS Topic**
- Select the SNS Topic created earlier from the `SNS topic` dropdown.
- Click the `Add` button to add the trigger.
3. **Prepare Code Upload**
- Click the `Code` tab on the Lambda function detail page.
- Select `.zip file` from the `Upload from` dropdown.
4. **Upload ZIP File**
- Upload the provided `lambda-wm-revoke-token-v1.0.0.zip` file.
- [lambda-wm-revoke-token-v1.0.0.zip](/files/lambda-wm-revoke-token-v1.0.0.zip)
- This ZIP file contains the following files:
- `index.js`: Main Lambda handler function
- `config.js`: Configuration file (needs modification)
- `constants.js`: Constants definition file
- `package.json`: Dependency information
5. **Complete Upload**
- Select the ZIP file and click the `Save` button.
- Once upload is complete, you can view the files in the code editor.
#### Modifying `config.js` Configuration File
1. **Modify config.js File**
- Open the `config.js` file in the code editor and modify the following content:
```json
{
"site_id": "{Your DoveRunner Site ID}",
"account_id": "{Your DoveRunner Account ID or Email}",
"access_key": "{Your DoveRunner Access Key}",
"aws_waf_web_acl_id": "{Your AWS WAF WebAcl ID}",
"aws_waf_web_acl_name": "{Your AWS WAF WebAcl Name}"
}
```
2. **Save Settings and Deploy**
- Once all configuration file modifications are complete, click the `Deploy` button.
- After deployment is complete, the function will run with the new settings.
### 4. Lambda, SNS, and WAF Integration Testing
#### Testing through Direct Message Publishing in AWS SNS
1. **Navigate to SNS Console**
- Navigate to the SNS service in the AWS Management Console.
- Select the SNS Topic created earlier.
2. **Prepare Message Publishing**
- Click the `Publish message` button on the Topic detail page.
- Subject is optional, so you can leave it blank.
3. **Write Message Body**
- Select `JSON` for Message format.
- Enter the following test message in the Message body:
```json
{
"site_id": "{Your DoveRunner Site ID}",
"revoke_token": "test-token"
}
```
4. **Publish Message**
- Click the `Publish message` button to publish the message.
- If successfully published, the Lambda function will be automatically triggered.
#### Integration Verification Methods
1. **Check Lambda Execution Logs through CloudWatch Logs**
- Navigate to the CloudWatch service in the AWS Management Console.
- Select `Logs` → `Log groups` from the left menu.
- Find and click the Log group in the format `/aws/lambda/[Lambda function name]`.
- Select the most recent Log stream to check the execution logs.
- If executed successfully, you can check the following logs:
- SNS message reception logs
- WAF rule update request logs
- Success/failure result logs
2. **Verify Rule Creation in AWS WAF**
- Navigate to the `WAF & Shield` service in the AWS Management Console.
- Select `Web ACLs` and change to Global Region, then click the created Web ACL.
- Check if new rules have been created in the `Rules` tab.
- Rule names are typically created in the format `waf-uri-contains-{test-token}`.
- Verify that the rule's Action is set to `Block`.
## Troubleshooting
### When Lambda Function Does Not Execute
- Verify that the SNS trigger is properly configured.
- Check if the Lambda function's execution role has the necessary permissions.
- Verify that the SNS Topic and Lambda function are in the same region.
### When WAF Rules Are Not Created
- Check error messages in CloudWatch Logs.
- Verify that the Lambda execution role has `wafv2:UpdateWebACL` permission.
- Check if the WAF configuration information in the config.js file is correct.
### When Session Revocation Does Not Work
- Verify that WAF rules are properly created.
- Check if the CloudFront distribution is connected to WAF.
- Verify that the actually issued token matches the WAF rule.
3. **Enter SNS Information**
- **Notification Name**: Enter an easily distinguishable name.
- **Use AWS IAM Role**: Uncheck the checkbox.
- **AWS ARN**: Enter the ARN of the SNS Topic created earlier.
- **AWS Access Key ID**: Enter the IAM user's AWS Access Key ID.
- **AWS Secret Key**: Enter the IAM user's Secret Key.
- Click the 'Save' button to register the SNS information.
#### Method B: Registration Using AWS IAM Role ARN
You can register SNS using an IAM Role ARN without AWS Access Key ID / AWS Secret Key.
1. **Add DoveRunner Role Permission to AWS SNS Access Policy**
- Add `sns:Publish` permission to the Access Policy of the created SNS Topic to allow messages from the DoveRunner IAM ARN.
- The DoveRunner IAM ARN can be obtained by contacting us via [Helpdesk](https://support.doverunner.com).
```json
{
"Version": "2008-10-17",
"Id": "__default_policy_ID",
"Statement": [
// ... existing policies ...
// Add DoveRunner Role permission
{
"Effect": "Allow",
"Principal": {
"AWS": "{{DoveRunner SNS Role ARN}}"
},
"Action": "sns:Publish",
"Resource": "{{SNS Topic ARN}}"
}
]
}
```
2. **Register AWS SNS through DoveRunner Console**
- Log in to [DoveRunner Console](https://console.doverunner.com). (You can also register through [DoveRunner API](../watermark-detection-api/).)
- Navigate to `Content Security` → `Forensic Watermarking` → `Settings` → `AWS SNS Settings` → `Register`
3. **Enter SNS Information**
- **Notification Name**: Enter an easily distinguishable name.
- **Use AWS IAM Role**: Check the checkbox.
- **AWS ARN**: Enter the ARN of the SNS Topic created earlier.
- Click the 'Save' button to register the SNS information.
### 2. AWS WAF Creation and CloudFront Application
#### Prerequisites for AWS WAF Creation
- **CloudFront Distribution Verification**
- A CloudFront distribution to which AWS WAF will be applied must be created in advance.
- Since CloudFront is a global service, AWS WAF can only be created in the Global (us-east-1) region.
- **Required Permissions Verification**
- The following permissions are required for WAF creation and CloudFront integration:
- `wafv2:CreateWebACL`
- `wafv2:UpdateWebACL`
- `cloudfront:UpdateDistribution`
- `cloudfront:GetDistribution`
#### AWS WAF Creation Guide
1. **Access AWS WAF Console**
- Search for and navigate to the 'WAF & Shield' service in the AWS Management Console.
- Select `Web ACLs` from the left menu.
2. **Create Web ACL**
- Click the `Create web ACL` button.
- Select `Global resources` in `Resource type` under `Web ACL details`.
- Enter a Web ACL name (e.g., `DoveRunner-Session-Revoke-ACL`).
3. **Connect CloudFront Distribution**
- Click the `Add AWS resources` button in the `Associated AWS resources` section.
- Select the CloudFront distribution to apply WAF to.
- Click the `Add` button to connect.
4. **Create Web ACL with Default Settings**
- In the `Add rules and rule groups` step, click `Next` without adding anything.
- In the `Set rule priority` step, also click `Next` with default settings.
- In the `Configure metrics` step, also click `Next` with default settings.
- In the `Review and create` step, review the settings and click `Create web ACL`.
5. **Verify Integration**
- Once Web ACL creation is complete, return to the CloudFront console and check the `Security` tab of the corresponding distribution.
- Verify that the Web ACL you just created is connected in `Security - Web Application Firewall (WAF)`.
6. **Save WebACL Information**
- After verifying the integration, navigate back to the 'WAF & Shield' service and go to `Web ACLs`.
- Set the Region to `Global`, then copy and save the `Name` and `ID` of the created WebACL.
- This information will be used in the Lambda function configuration file.
### 3. AWS Lambda Function Creation
#### Creating Lambda IAM Permissions and Execution Role
To configure Lambda@Edge, you must first create the necessary IAM permissions and execution role for this functionality.
1. **Create Lambda Policy**
- Navigate to the **IAM** service in the AWS Management Console.
- Select **Policies** from the left menu, then click the **Create policy** button.
- Select the **JSON** tab and copy and paste the policy content below.
```json
{
"Statement": [
{
"Action": [
"wafv2:GetWebACL",
"wafv2:UpdateWebACL"
],
"Effect": "Allow",
"Resource": "*"
},
{
"Action": [
"logs:CreateLogGroup",
"logs:CreateLogStream",
"logs:PutLogEvents"
],
"Effect": "Allow",
"Resource": "arn:aws:logs:*:*:*"
}
],
"Version": "2012-10-17"
}
```
2. **Configure Trust Relationship**
- Add the role below to the `Trust Relationship` tab of the created role.
```json
{
"Version": "2012-10-17",
"Statement": [
{
"Effect": "Allow",
"Principal": {
"Service": [
"lambda.amazonaws.com",
"edgelambda.amazonaws.com"
]
},
"Action": "sts:AssumeRole"
}
]
}
```
#### Lambda Function Creation
> Session revocation lambda files can be found on the [Sample Downloads](../../getting-started/fwm-downloads/) page.
1. **Start Lambda Function Creation**
- Click the `Create function` button on the Lambda dashboard.
- Must be created in the same region as the SNS Topic created earlier.
- Select the `Author from scratch` option.
2. **Enter Basic Information**
- **Function name**: Enter a name (e.g., `DoveRunner-Session-Revoke-Function`).
- **Runtime**: Select Node.js 22.x or the latest version.
- **Architecture**: Select x86_64.
3. **Configure Execution Role**
- Click `Change default execution role`.
- Select `Use an existing role`.
- Apply the IAM execution role created in the previous step.
4. **Complete Function Creation**
- Click the `Create function` button to create the function.
- Once creation is complete, you will be redirected to the function detail page.
#### Adding SNS Trigger and Uploading Source Code
1. **Add Trigger**
- Click the `+ Add trigger` button in the Function overview section.
- Select `SNS` as the trigger source.
2. **Select SNS Topic**
- Select the SNS Topic created earlier from the `SNS topic` dropdown.
- Click the `Add` button to add the trigger.
3. **Prepare Code Upload**
- Click the `Code` tab on the Lambda function detail page.
- Select `.zip file` from the `Upload from` dropdown.
4. **Upload ZIP File**
- Upload the provided `lambda-wm-revoke-token-v1.0.0.zip` file.
- [lambda-wm-revoke-token-v1.0.0.zip](/files/lambda-wm-revoke-token-v1.0.0.zip)
- This ZIP file contains the following files:
- `index.js`: Main Lambda handler function
- `config.js`: Configuration file (needs modification)
- `constants.js`: Constants definition file
- `package.json`: Dependency information
5. **Complete Upload**
- Select the ZIP file and click the `Save` button.
- Once upload is complete, you can view the files in the code editor.
#### Modifying `config.js` Configuration File
1. **Modify config.js File**
- Open the `config.js` file in the code editor and modify the following content:
```json
{
"site_id": "{Your DoveRunner Site ID}",
"account_id": "{Your DoveRunner Account ID or Email}",
"access_key": "{Your DoveRunner Access Key}",
"aws_waf_web_acl_id": "{Your AWS WAF WebAcl ID}",
"aws_waf_web_acl_name": "{Your AWS WAF WebAcl Name}"
}
```
2. **Save Settings and Deploy**
- Once all configuration file modifications are complete, click the `Deploy` button.
- After deployment is complete, the function will run with the new settings.
### 4. Lambda, SNS, and WAF Integration Testing
#### Testing through Direct Message Publishing in AWS SNS
1. **Navigate to SNS Console**
- Navigate to the SNS service in the AWS Management Console.
- Select the SNS Topic created earlier.
2. **Prepare Message Publishing**
- Click the `Publish message` button on the Topic detail page.
- Subject is optional, so you can leave it blank.
3. **Write Message Body**
- Select `JSON` for Message format.
- Enter the following test message in the Message body:
```json
{
"site_id": "{Your DoveRunner Site ID}",
"revoke_token": "test-token"
}
```
4. **Publish Message**
- Click the `Publish message` button to publish the message.
- If successfully published, the Lambda function will be automatically triggered.
#### Integration Verification Methods
1. **Check Lambda Execution Logs through CloudWatch Logs**
- Navigate to the CloudWatch service in the AWS Management Console.
- Select `Logs` → `Log groups` from the left menu.
- Find and click the Log group in the format `/aws/lambda/[Lambda function name]`.
- Select the most recent Log stream to check the execution logs.
- If executed successfully, you can check the following logs:
- SNS message reception logs
- WAF rule update request logs
- Success/failure result logs
2. **Verify Rule Creation in AWS WAF**
- Navigate to the `WAF & Shield` service in the AWS Management Console.
- Select `Web ACLs` and change to Global Region, then click the created Web ACL.
- Check if new rules have been created in the `Rules` tab.
- Rule names are typically created in the format `waf-uri-contains-{test-token}`.
- Verify that the rule's Action is set to `Block`.
## Troubleshooting
### When Lambda Function Does Not Execute
- Verify that the SNS trigger is properly configured.
- Check if the Lambda function's execution role has the necessary permissions.
- Verify that the SNS Topic and Lambda function are in the same region.
### When WAF Rules Are Not Created
- Check error messages in CloudWatch Logs.
- Verify that the Lambda execution role has `wafv2:UpdateWebACL` permission.
- Check if the WAF configuration information in the config.js file is correct.
### When Session Revocation Does Not Work
- Verify that WAF rules are properly created.
- Check if the CloudFront distribution is connected to WAF.
- Verify that the actually issued token matches the WAF rule.